
admin1
June 19, 2025
Simple Methods to Install Wheel Weights Inside Tire Correctly

You can achieve smoother driving and better tire wear by installing wheel weights inside your tire using stick-on wheel weights. When you place adhesive wheel weights on a clean inner wheel surface, you help balance the wheel and tire assembly. This process reduces vibrations, improves handling, and gives you more control when braking or cornering. Studies show that balanced wheel weights inside tire setups can lead to shorter braking distances and better traction, especially on slippery roads. With even weight distribution, your tires last longer and your wheel performs better at any speed.
Why Proper Wheel Weights Inside Tire Matter
Performance and Safety Benefits
When you install wheel weights inside tire correctly, you help your car run smoothly and safely. The importance of wheel weights comes from how they keep your wheel and tire in proper balance. This balance affects your driving experience every time you get behind the wheel.
- You will notice less shaking or vibration, especially when you drive at speeds between 60 and 80 km/h.
- Your tires will wear evenly, so you avoid strange patterns like wavy or blocky spots.
- The steering wheel stays straight when you drive, so you do not have to keep correcting your direction.
- You get better handling and more comfort, which makes every trip more enjoyable.
- The ride feels smoother, and your car performs better on the road.
- Your tires last longer, and you spend less money on replacements.
- The suspension and steering parts of your car do not wear out as quickly, which keeps your car safer and lowers repair costs.
Tip: A balanced wheel helps improve traction, especially when roads are wet or slippery. This means you can stop faster and stay in control.
When you use wheel weights inside tire, you make sure your car gets all these benefits. Proper balance is not just about comfort; it also protects your tires and your safety.
Effects of Incorrect Installation
If you do not install wheel weights the right way, you can face many problems. An imbalanced tire can cause your car to shake or pull to one side. This makes driving harder and less safe.
- Your tires may wear out unevenly, which means you need to replace them sooner.
- The steering wheel might vibrate or feel loose, making it tough to keep your car straight.
- You could lose some control, especially when turning or stopping quickly.
- The suspension and steering parts of your car may get damaged faster, leading to expensive repairs.
Incorrect wheel weight installation can also reduce your car’s performance. You might notice more noise, less comfort, and a rougher ride. Always check that your wheel weights are in the right place and secure. This simple step keeps your wheel and tire in balance and helps your car work its best.
Choosing Wheel Weights for Inside Tire Installation
Types of Wheel Weights Suitable for Inside Tire
When you want to balance your tires, you need to choose the right type of wheel weights. Not all wheel weights work for every wheel or tire. You will find two main types used inside the tire:
Adhesive wheel weights
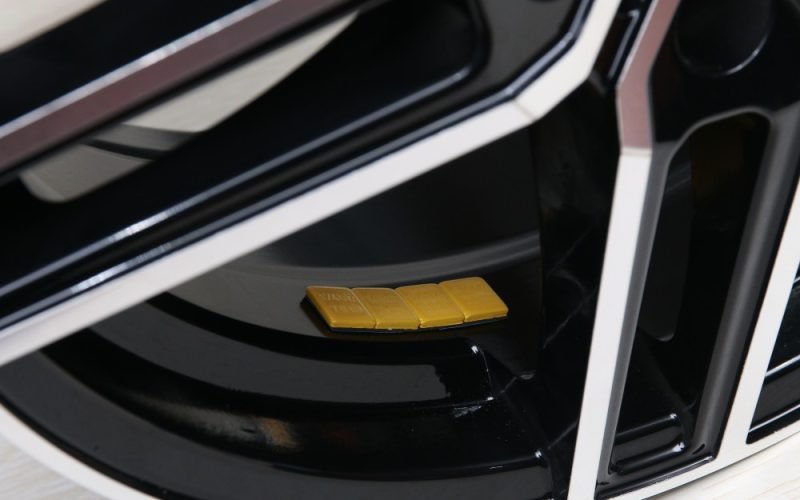
These attach to the inner surface of the wheel using strong glue. You can use them on aluminum alloy wheels and composite wheels. They come in standard and low-profile designs, so you can fit them even in tight spaces. You must clean the wheel surface before you stick them on, or they may not hold well, especially if the wheel gets hot.Clip-on wheel weights
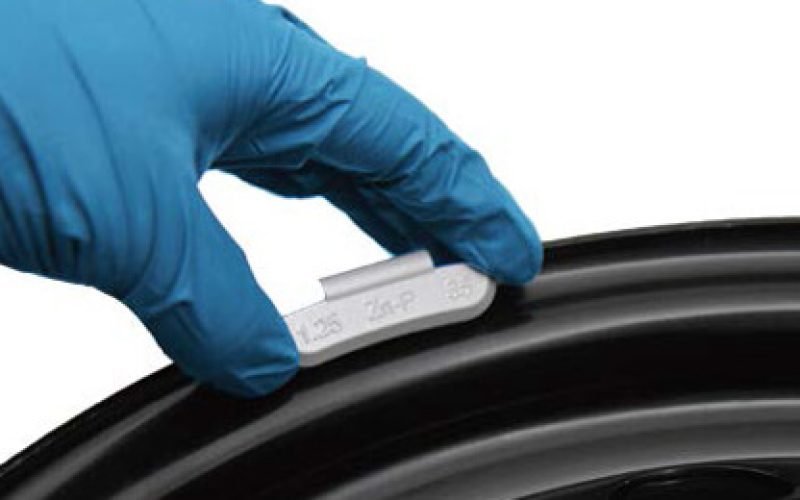
These clamp onto the rim’s inner or outer lip with a metal clip. You often see them on steel wheels. They are easy to install and remove. Some wheels with special coatings or glossy finishes need clip-on weights because adhesive types might not stick well.
Note: Both types of wheel weights help balance the wheel and tire assembly. This reduces vibrations and improves your car’s stability and handling. Sometimes, you may need both types together for perfect balance.
You should always check your wheel type before picking the right automotive wheel weights. This helps you get the best results for your car.
Advantages of Adhesive Wheel Weights
Adhesive wheel weights offer several benefits that make them a popular choice for modern vehicles. Many car owners and tire shops prefer them for these reasons:
- You can use adhesive wheel weights on flangeless alloy rims, where clip-on weights do not fit.
- They keep the outside of your wheel looking clean because you place them on the inside, out of sight.
- They are easier and less costly to make, which means you get a good value.
- Tire shops find them easier to manage because there are fewer types to keep in stock.
- New wheel balancer technology, like laser guides, helps you place adhesive wheel weights more accurately.
Empirical research and industry experts agree that adhesive wheel weights are the best choice for many modern wheels. You get a neat look, reliable performance, and easy installation. As more cars use alloy wheels, adhesive wheel weights have become the standard for both original equipment and aftermarket needs.
Tip: Always clean the wheel surface before applying adhesive wheel weights. This ensures they stick well and last longer.
Step-by-Step Wheel Weight Installation Guide

Installing wheel weights inside tire requires careful attention to detail. This guide will help you follow best practices for proper installation. You will learn how to gather the right tools, clean the wheel, and use wheel balancing equipment for accurate placement. Each step in the installation process ensures your tire and wheel assembly stays balanced for a smooth ride.
Gather Tools and Materials Needed
Start by collecting all the tools and materials you need for wheel weight installation. Having everything ready makes the installation process faster and more efficient. Here is a checklist to help you prepare:
- Wheel weights (adhesive or clip-on, as needed)
- Wheel balancer (manual or electronic)
- Rim width caliper
- Tire lever or removal tool
- Cleaning supplies (degreaser, detergent, clean cloths)
- Gloves and safety glasses
- Marking pen or chalk
- Mounting accessories (cones, collets, or adapters)
- Torque wrench (for wheel reinstallation)
Tip: Always use high-quality wheel weights and wheel balancing equipment. This ensures accurate balance and long-lasting results.
Check that your tools are clean and in good condition. Proper tools help you achieve the correct balance and make the installation process smoother.
Clean the Wheel Surface Thoroughly
Cleaning the wheel surface is a critical step before you apply wheel weights. Dirt, grease, or moisture can prevent the adhesive from sticking, which leads to poor balance and possible weight loss during driving. Follow a proven cleaning protocol to ensure the inner wheel surface is ready for adhesive application.
| Cleaning Stage | Purpose |
|---|---|
| Preclean | Remove loose dirt and debris |
| Main clean | Eliminate grease and firmly attached residues |
| Rinse | Wash away detergent and dissolved dirt |
| Disinfect | Reduce microorganisms and prevent cross-contamination |
| Final rinse | Remove any disinfectant residues |
| Dry | Eliminate moisture to prevent microbial growth |
| Optional disinfection | Use ozone or hydrogen peroxide vapor for extra microbial control |
You should follow each stage for the best results. Start by wiping away loose dirt. Use a degreaser to remove oil and sticky residues. Rinse the wheel with clean water. Disinfect the surface to reduce germs. Rinse again to clear away any leftover chemicals. Dry the wheel completely before moving to the next step. Some shops use ozone or vapor for extra cleaning, but this is optional.
Experts recommend validating your cleaning process. You can do this by swabbing the surface and checking for dirt or germs. Repeat the cleaning if needed. Regular audits and training help keep your cleaning standards high. Clean wheels help the adhesive stick better, which improves the balance and safety of your tire.
Use a Wheel Balancer to Identify Placement
A wheel balancer is essential for finding the proper placement of wheel weights. This tool measures where the imbalance is and tells you exactly where to put the weights. Using a wheel balancer ensures you achieve the best possible balance for your tire and wheel.
| Calibration Data / Accuracy Metric | Description |
|---|---|
| Rim Width Measurement | Use a rim width caliper for accurate wheel width input |
| Rim Distance from Backing Plate | Measure with a sliding scale for correct offset |
| Wheel Diameter | Input the correct diameter for precise calculations |
| Balancer Accuracy | Modern balancers can detect imbalances as small as 1 gram (0.10 ounce) |
| Calibration Test Weight | Use to verify the balancer’s accuracy |
| Mounting Repeatability | Even a 0.006″ offset can cause a half-ounce error |
| Mounting Accessories | Use adapters or collets for precise mounting |
| Dynamic and Static Balance | Balancer calculates both types for optimal results |
| Mounting Method | Mimic vehicle mounting to avoid errors |
You must mount the wheel on the balancer using the correct accessories. Enter the wheel’s width and diameter. The balancer will spin the wheel and show you where to place the weights. Always check the calibration of your balancer with a test weight. Even a small error in mounting can cause a big imbalance. Use adapters or collets that fit your wheel type for the most accurate results.
The balancer’s computer calculates the exact amount and location for each weight. Follow the display instructions for proper placement. This step is key for achieving perfect balance and smooth driving. Accurate wheel balancing prevents vibrations and extends the life of your tire.
Note: Proper installation and use of a wheel balancer are the foundation of effective wheel weight installation. Always follow the application guide for your equipment.
Select and Handle the Correct Wheel Weights
You need to select the right wheel weights for your vehicle to achieve the best results. The selection process follows clear guidelines to ensure proper installation and long-lasting performance. Here is a step-by-step guide to help you choose and handle wheel weights inside tire:
- Check your vehicle type and model. Different cars and trucks require different sizes and designs of wheel weights.
- Measure your wheel size and weight. Larger wheels may need heavier or more weights for balance.
- Think about your driving needs. High-speed or performance vehicles need more precise balance.
- Choose the material. You can find wheel weights made from lead, zinc, or steel. Some states have rules about using lead, so always check local regulations.
- Pick the right installation method. Use adhesive wheel weights for smooth, flangeless rims. Use clip-on weights for wheels with a rim edge.
- Always buy from reputable brands. This ensures you get quality products that meet safety and environmental standards.
Tip: Wear gloves and a mask when handling wheel weights. This protects your skin and lungs from dust or particles.
Handle the weights carefully to avoid bending or damaging them. Place them on a clean, dry surface before installation. Avoid touching the adhesive side with your fingers, as oils can weaken the bond. Follow the application guide for your specific wheel and weight type.
Regular inspection keeps your wheels safe. Check the weights every 10,000 to 20,000 km or after any tire service. If you notice vibrations or changes in handling, inspect the weights and rebalance if needed.
Apply the Weight with Proper Pressure and Technique
You must apply the wheel weights with the correct pressure and technique to ensure they stay in place. Start by peeling the backing off the adhesive wheel weights. Hold the weight by the edges to keep the adhesive clean.
- Align the weight with the marked placement spot on the inner wheel surface.
- Press the weight firmly onto the wheel. Use steady, even pressure for at least 10 seconds.
- Make sure there are no air bubbles or gaps under the weight. This helps the adhesive bond tightly.
If you use clip-on weights, position them on the rim edge and tap them gently with a rubber mallet. Do not hit too hard, as this can damage the wheel or the weight.
Note: Always follow the application guide from the manufacturer. This ensures you use the right amount of pressure and the correct placement for each weight.
Check that the weights are secure before moving to the next step. A loose weight can fall off and cause imbalance. Proper wheel weight installation gives you a smoother ride and better tire life.
Allow Adhesive to Cure Properly
After you apply the adhesive wheel weights, you need to let the adhesive cure. Curing means the glue sets and reaches its full strength. If you rush this step, the weights may not stick well, and you could lose balance.
Studies show that longer curing times and the right temperature increase the strength of the adhesive. For example, a 24-hour cure at 22°C gives the highest bond strength, reaching 11.2 MPa. Shorter times or higher temperatures reduce the adhesive’s holding power.
| Cure Time (Hours) | Cure Temp (°C) | Test Temp (°C) | Adhesion Test Value (MPa) |
|---|---|---|---|
| 24 | 22 | 22 | 11.2 |
| 8 | 30 | 22 | 9.0 |
| 24 | 50 | 50 | 7.5 |
| 24 | 50 | 22 | 10.83 |
| 8 | 30 | 30 | 8.23 |
| 24 | 30 | 22 | 10.43 |
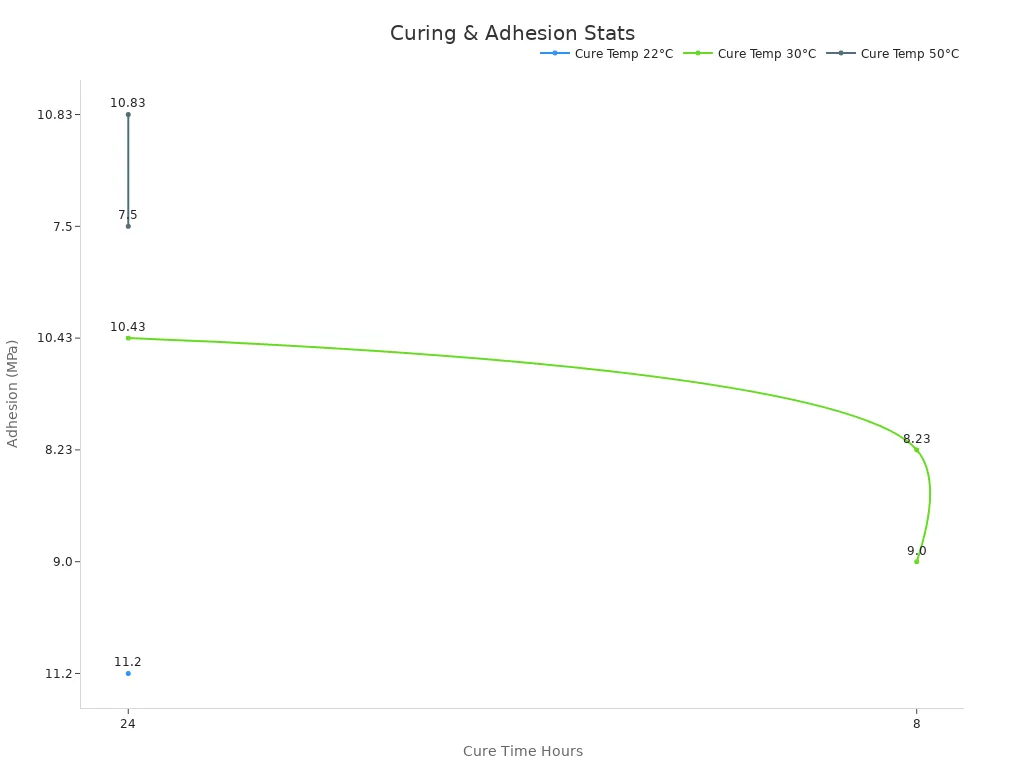
You should let the adhesive cure for at least 24 hours at room temperature for the best results. If you need to use the wheel sooner, keep the temperature steady and avoid moisture. Clinical data also show that adhesives cured with light or heat have higher strength and last longer.
Tip: Do not wash your car or drive in heavy rain right after installation. Give the adhesive time to reach full strength.
Proper installation and curing help your wheel weights inside tire stay secure. This step ensures your wheel weight installation lasts and keeps your wheels balanced for a long time.
Re-Check Tire Balancing
After you finish wheel weight installation, you need to re-check the balance of your tire. This step helps you confirm that your work has created a smooth and safe ride. Even if you followed every step carefully, small errors can still happen. Dust, uneven pressure, or a missed spot can cause a slight imbalance. Re-checking ensures you catch these issues before you put the wheel back on your car.
You should use a wheel balancing machine again for this step. Mount the wheel and tire assembly on the balancer. Let the machine spin the wheel and check for any remaining imbalance. If the machine shows a problem, adjust the weights or add a small amount more. Repeat the process until the balancer shows the tire is within the recommended tolerance.
Tip: Always re-check tire balancing after any installation or adjustment. This habit helps you avoid future problems and keeps your vehicle running smoothly.
Industry experts agree that this extra step makes a big difference. When you re-check tire balancing, you help prevent vibrations and uneven tire wear. You also protect your car’s suspension and steering parts from damage. Many fleets and repair shops report that this step increases tire life and improves fuel efficiency.
Here is a table that shows how re-checking tire balance can improve your vehicle’s performance and safety:
| Statistic / Insight | Description |
|---|---|
| 20-40% increase in tire mileage | Balancing tires leads to a significant increase in tire life, confirmed by a 2012 study covering 20 million miles. |
| 30% tire life improvement | Observed by fleets after balancing, extending mileage from ~50,000-55,000 to 80,000-85,000 miles. |
| Up to 2% fuel efficiency gain | Balancing optimizes fuel economy, contributing to operational savings. |
| Reduction in vibration damage | Balancing reduces wear on suspension parts, bearings, U-joints, and electronics, lowering maintenance costs and downtime. |
| Continuous adjustment with new tech | Some balancing technology adapts to tread wear and road conditions, maintaining balance and even tire footprint. |
| Identification of other vehicle issues | Balanced tires help detect problems like failing U-joints by improving ride smoothness. |
| Expert consensus | Experts emphasize that ignoring imbalance causes premature tire wear and that balancing is critical for safety and efficiency. |
You can see that proper wheel balancing and re-checking after installation lead to longer tire life, better fuel economy, and fewer repairs. These benefits save you money and keep your car safer on the road.
You have two main ways to re-check balance:
- Off-vehicle balancing works best for initial checks. It finds both static and dynamic imbalances.
- On-vehicle balancing helps you find any remaining vibration after installation. This method checks the entire wheel-end assembly, including the hub and drum. It is especially useful for older vehicles.
Experts recommend always re-checking balance before you drive. This step helps you spot any last issues and ensures your car is ready for the road. You avoid the risk of vibration, uneven tire wear, and costly repairs.
When you make re-checking tire balancing a habit, you get the most out of your wheel weight installation. You enjoy a smoother ride, longer tire life, and greater safety every time you drive.
Common Wheel Weight Installation Mistakes and Troubleshooting
Mistakes to Avoid During Installation
You can avoid many problems by following some key installation tips when working with wheel weights. One common mistake is not cleaning the wheel surface well enough. Dirt or grease can stop adhesive wheel weights from sticking, which leads to poor balance and tire vibration concerns. You should always use a clean cloth and proper cleaner before you start.
Another mistake is placing the wheel weights in the wrong spot. If you do not use a wheel balancing machine, you might guess the location and cause imbalance. Always use the right equipment for your shop and wheel type. Some people rush the installation and do not let adhesive weights cure. If you drive too soon, the weights can fall off, and your tires will lose balance.
Here are some installation tips to help you avoid mistakes:
- Double-check the wheel surface for dirt or oil.
- Use a wheel balancer to find the exact placement.
- Press adhesive weights firmly and let them cure for at least 24 hours.
- Re-check the balance after installation.
Remember: Careful installation keeps your tires balanced and improves performance.
Troubleshooting Tips for Wheel Weights Inside Tire
If you notice tire vibration concerns or uneven tire wear, you may need to troubleshoot your wheel weights. Start by checking if any weights have fallen off or shifted. Look for signs of loose or missing weights on the inside of the wheel. If you find a problem, remove the old weights and clean the area before installing new ones.
Regular wheel balancing helps prevent issues. Experts say fleets that follow best practices and use balance rings see tire life increase by up to 50% for trailers. This shows that proper balancing and regular checks can solve many problems. If you still feel vibrations after balancing, check for other issues like bent wheels or damaged tires.
Use these troubleshooting tips:
- Inspect wheels for missing or loose weights.
- Rebalance tires if you feel vibrations or see uneven wear.
- Use the right balancing equipment for your wheel type.
- Follow installation tips every time you work on your wheels.
Tip: Preventive maintenance and regular wheel balancing keep your tires in top shape and improve safety.
You can install wheel weights inside your tire with ease when you follow each step carefully. This process helps you achieve better tire balance and improves your vehicle’s performance. You protect your tires from uneven wear and keep your ride smooth. Always double-check your work before you finish.
Take your time and pay attention to detail. You will enjoy a safer and more comfortable drive.
FAQ
How do you know if your wheel weights are installed correctly?
You should not feel vibrations when you drive. Your steering wheel stays steady. If you use a wheel balancer, it will show zero or very low imbalance. Always check the weights after driving a short distance.
Can you reuse adhesive wheel weights?
No, you should not reuse adhesive wheel weights. The glue loses strength after removal. Always use new weights for each installation. This keeps your wheels balanced and safe.
What happens if you skip cleaning the wheel before installing weights?
Dirt or grease stops the adhesive from sticking. The weights can fall off while you drive. You may feel shaking or see uneven tire wear. Always clean the wheel surface first.
How long should you wait before driving after installing adhesive wheel weights?
Wait at least 24 hours at room temperature. This gives the adhesive time to cure and reach full strength. Quick driving or washing can weaken the bond and cause the weights to fall off.
Do you need special tools to install wheel weights inside the tire?
Yes, you need a wheel balancer, cleaning supplies, and the correct weights. A rim width caliper and torque wrench help with accuracy. Using the right tools ensures a safe and balanced installation.
